- Xtreme3D 3
- Деревья (плагин SpeedTree) на Unity 3D
- Учебные материалы для школы программирования. Часть 6
- Порядок выполнения
- 5 Free Tree Generator For Blender
- Blender Modular Tree
- tree-gen
- Sapling Tree Gen
- Stylized Fantasy Tree Generator
- Trees in Geometry Nodes
- Sapling Tree Gen
- Activation
- Interface
- Instructions
- Geometry
- Branch Radius
- Branch Splitting
- Branch Growth
- Pruning
- Leaves
- Armature
- Animation
Xtreme3D 3
На сегодняшний день, пожалуй, лучший бесплатный генератор деревьев и растений. Поддерживает множество опций, экспортирует модели в FBX, OBJ, X и DBO (формат Dark Basic). В комплект входит богатый набор текстур листьев и коры. На сайте программы отдельно есть коллекция готовых примеров деревьев для скачивания.
Tree It достаточно активно обновляется — вполне вероятно, что в будущем в нем появится еще больше возможностей.
Генератор деревьев. Создает любые породы деревьев, причем модели хорошо оптимизированы для использования в играх. Экспортирует в форматы X, OBJ и B3D, есть также возможность отрендерить дерево в картинку, чтобы использовать в игре в качестве биллборда.
Tree[d] работает как самостоятельная программа и как плагин к лайтмэпперу Gile[s] (см. выше). В комплект входит базовый набор текстур листьев и коры.
Еще один бесплатный генератор деревьев, к тому же свободный. По функциональности похож на Tree[d], создает низкополигональные деревья, подходящие для игр. Экспортирует в формат OBJ. Проект также включает библиотеку ProcTree, при помощи которой можно генерировать деревья в программах на C++.
Генератор низкополигональных растений и растительных объектов. Имеется поддержка анимации и удобный мастер, где шаг за шагом вам объяснят, как создать растение. Экспорт моделей осуществляется в форматы 3DS, LWO, OBJ, DXF, INC и WRL. Программа очень старая, но вполне функциональная, работает на современных Windows без сбоев. В архиве прилагается коллекция готовых растений.
С 2009 года программа стала бесплатной. Для регистрации используйте данные из файла REGISTER.txt.
Генератор человекоподобных персонажей. Принцип работы — комбинирование различных пресетов: можно выбрать форму головы, уши, нос, рот, глаза, кисти рук, пропорции тела и т.д. Пресеты сгруппированы по типу (фэнтези, демон, киборг, мужчина, женщина, манга и др.). Готовую модель можно экспортировать в формат 3DS или DXF. Недостаток — у моделей нет UV-развертки, но ее можно создать в других программах.
Очень интересный инструмент, предназначенный для моделирования человеческих лиц по фотографиям.
Источник
Деревья (плагин SpeedTree) на Unity 3D
Учебные материалы для школы программирования. Часть 6
Предыдущие уроки можно найти здесь:
В Unity, в asset store, можно найти множество готовых объектов для будущей игры, но иногда, хочется сделать что-то своими руками. Для зданий, и других простых архитектурных объектов, мы часто использовали SketchUp, для «живых» анимированных объектов — Blender. На этом уроке, мы сами «вырастим» дерево в Unity!
Небольшое отступление для тех, кто следит за публикациями, но не решается попробовать включить в свои уроки новые инструменты. Попробуйте сделать первый шаг с 3D. Программ по 3D моделированию очень много, среди них есть настолько простые, что методом «тыка» можно освоить их за пару вечеров. Посмотрите обязательно:
- Tinkercad — составление фигур из геометрических форм;
- SketchUp — для более детально проработанных архитектурных объектов;
- ZBrush — можно создавать сложные, крутые модели, а можно ограничиться «лепкой» колобка, что тоже очень занятно!
Но вернемся к теме занятия, и рассмотрим, как создать дерево с помощью плагина SpeedTree, включённого в дистрибутив Unity.
Порядок выполнения
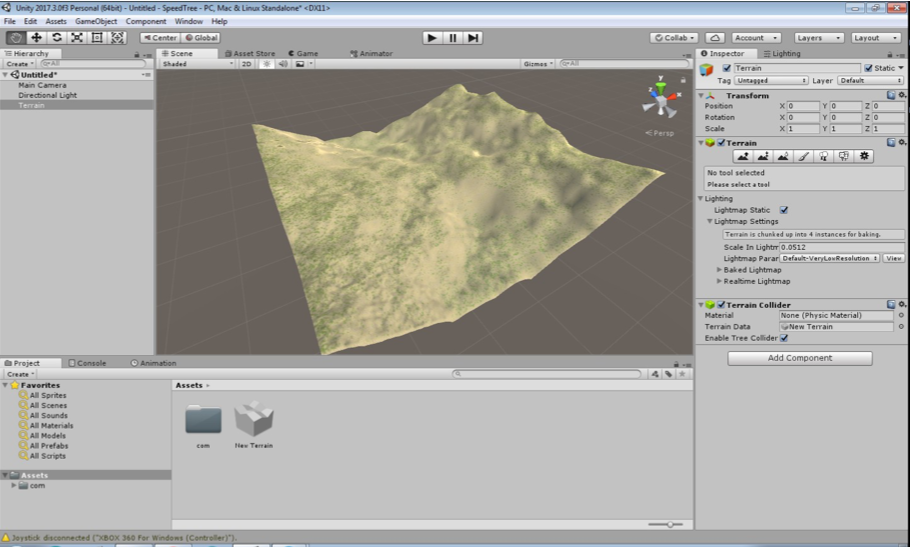
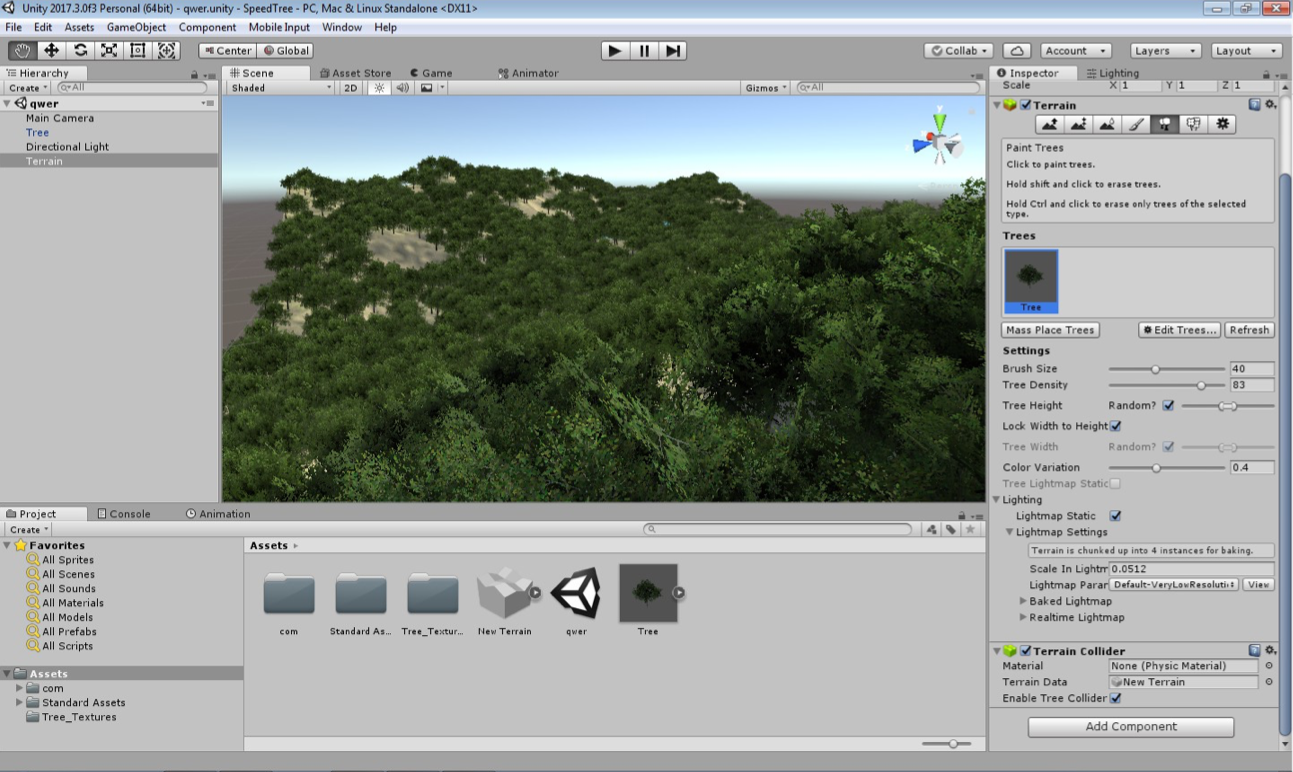
Создадим новый проект, в нём создадим террейн.
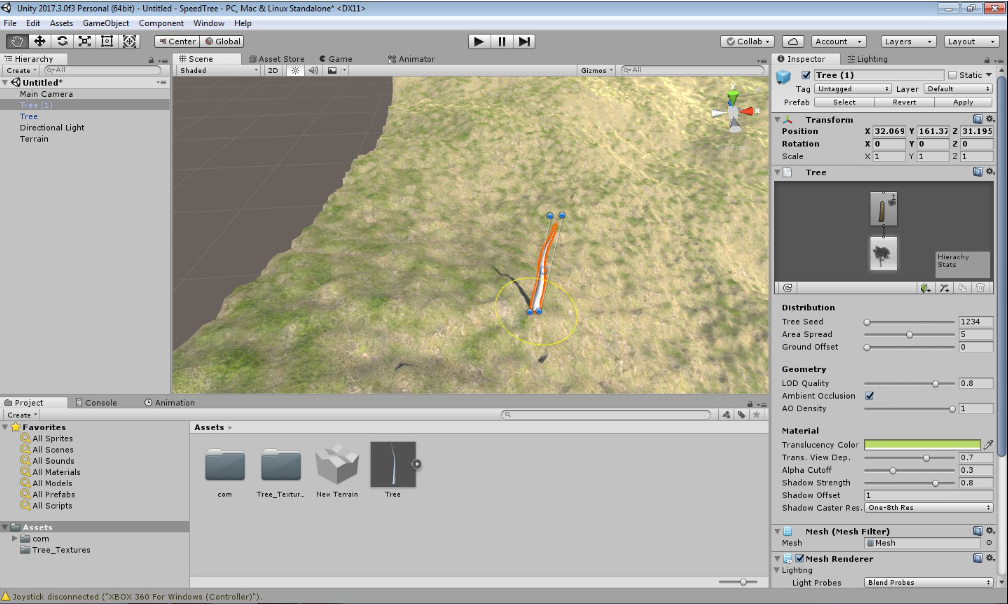
Добавим на него объект 3D Object → Tree
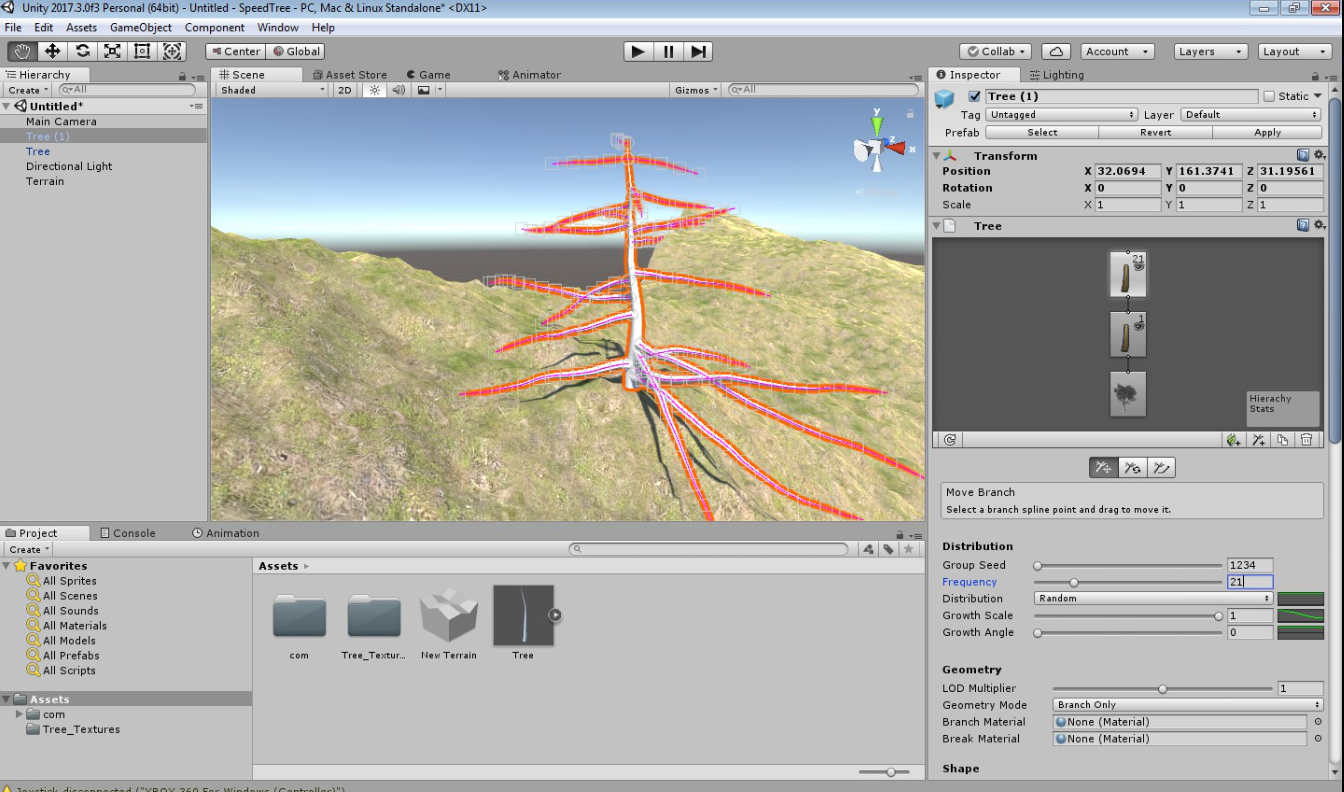
Добавим дереву ветки, создав блок веток. Увеличим их количество примерно до 20 (интересующие параметры выделены синим). В каждом блоке изменяем параметр Frequency (цветом на скриншоте не выделен).
Изменим их расположение, поменяв кривые распределения, длины, и поменяем ползунок стремления ветвей к свету.
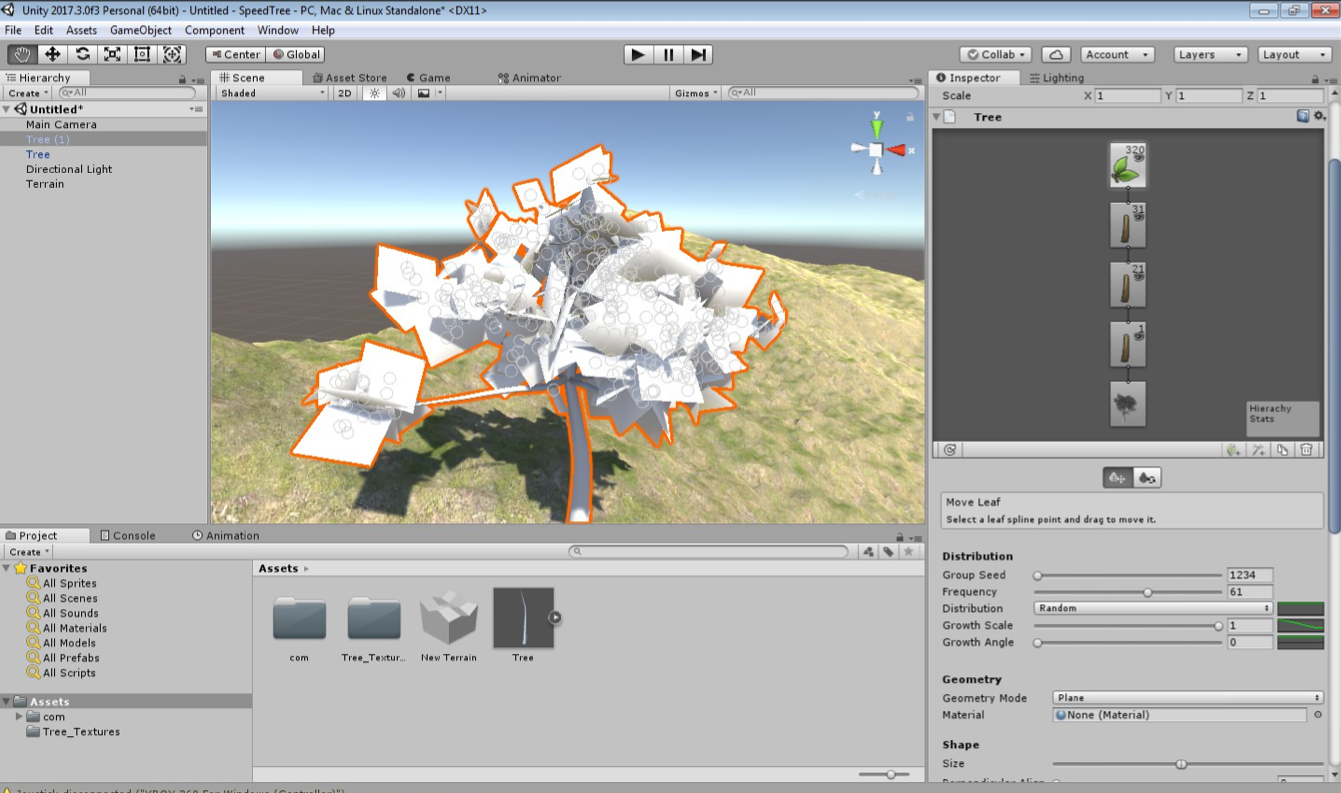
Далее, добавим к этим ветвям ещё несколько веток.
Следующий шаг — выставление материалов.
Для деревьев важно выставлять материалы с помощью шейдера Nature. Импортируем стандартный ассет Environment, он содержит готовые материалы. Материалы коры нужно назначить всем веткам. Если материал не подходит, Unity предложит использовать корректный материал.
Жмём Apply и «переконвертирования» материала. Будьте осторожны, Unity часто вылетает на этом этапе.
Итак, дерево готово! Его можно разместить на террейне благодаря Mass Place Trees.
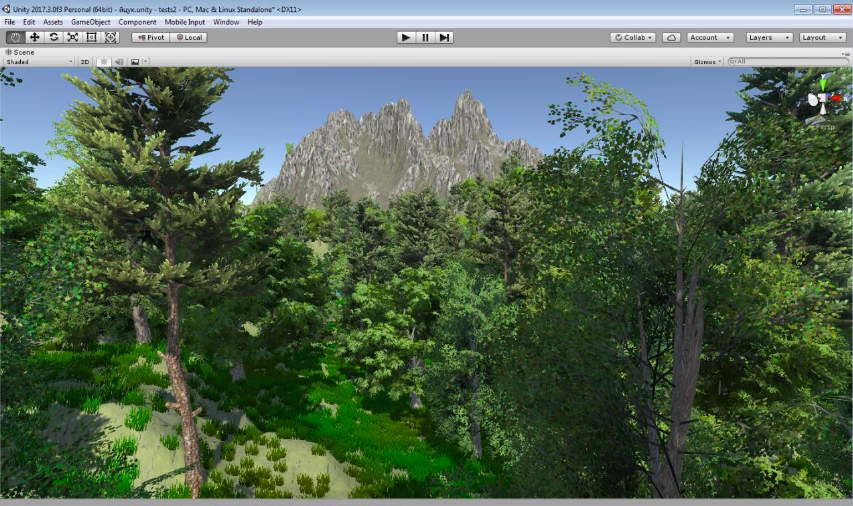
При должном усердии, можно получить вот такой лес:
Источник
5 Free Tree Generator For Blender
In this article, we will be discussing five free tree generator for Blender. If you are in the market for a new tree generator or if you are just curious about what is available, this article is for you. We will be discussing the pros and cons of each option so that you can make an informed decision about which one is right for you.
Blender Modular Tree
Mtree, also known as modular tree, is a free add-on for Blender that helps you create trees by connecting easy-to-use nodes. You can almost create any kind of tree just by changing the values in these nodes.
With Mtree, you can create any kind of tree you want, simply by changing the values in the nodes. This makes it very versatile and easy to use, making it a great add-on for Blender.
tree-gen
Tree gen is another plugin for Blender to help you create trees, and because it’s procedural, you can make a variety of trees, each different from the other.
With Tree Gen, you can create a variety of different trees, each with their own unique look. The plugin is procedural, so you can make as many different trees as you want.
Sapling Tree Gen
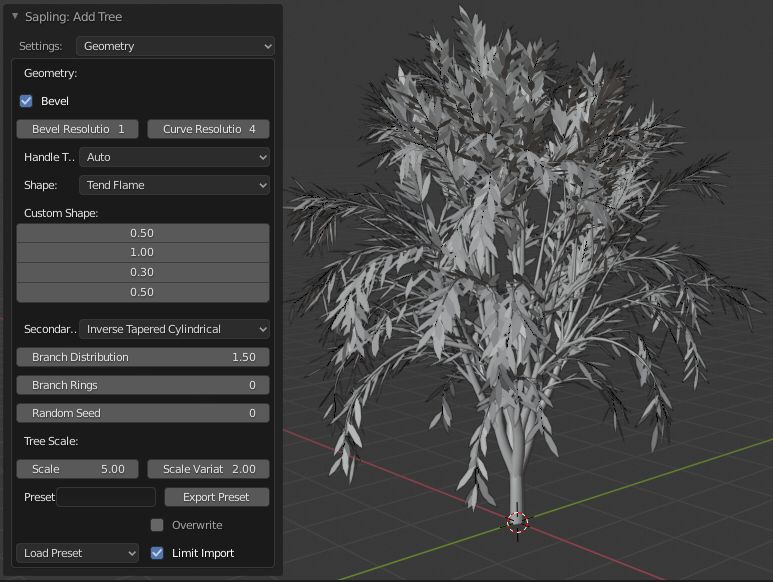
Sapling Tree Gen is one of the plugins that comes with Blender by default, and it may not be as good as a geometry node based tree generator, but it is good enough that you can make some convincing and great looking trees. Another thing is that because this is not a geometry node based tree generator, you can’t change your trees much after creating them. You may have to create another tree to make the expected changes.
How to get it: Search the name, then enable it as add-on.
Stylized Fantasy Tree Generator
Another great geometry node based tree generator for Blender, and the amazing thing is that it comes with a default tree and you can change it however you like with given parameters that are exposed in the modifier stack, but the only negative point is that the trees it generates are not super realistic, rather it is made for generating stylized fantasy trees.
Trees in Geometry Nodes
Again, this is another tree generator based on geometry nodes, but unlike others, it’s not a complete geo-node based tree generator system, rather the repo contains some nodes for generating trees based on splines and curves. It was made using Blender 3.2.0 Alpha. It will probably work with newer versions since Geometry Nodes have switched to Fields.
Источник
Sapling Tree Gen
This add-on creates trees. There are many preset tree types to choose from or create your own. The method is presented by Jason Weber & Joseph Penn in their paper “Creation and Rendering of Realistic Trees”.
Activation
- Open Blender and go to Preferences then the Add-ons tab.
- Click Add Curve then Sapling Tree Gen to enable the script.
Interface
Located in the 3D Viewport ‣ Add ‣ Curve menu.
Instructions
Once the tree is created there are eight settings to build your tree. When creating your tree it’s often best to use the settings in order until your familiar with them.
Geometry
This determines whether the curve should be shown with its full thickness or only the underlying curve. Disabled by default to permit rapid feedback on parameter changes.
Determines how smooth the outline of the beveled curve is. The lower this value, the smaller the number of vertices but the resulting geometry will be coarser.
Changes the smoothness of the curve along its length. This is only relevant if Handle Type is set to Auto.
Determines the method of interpolation of the curve between Bézier points. Vector type results in fewer vertices but straight segments. Auto type smooths the segments but requires more expensive geometry.
Governs the distribution of branches in order to effect the overall shape of the tree.
Customize the branch shape along the branch length.
Change the style of secondary branches.
Adjust branch distribution towards the top or bottom of the tree.
Grow the Branches in Rings.
Sets the basis on which all random values for the tree are generated. This can be changed to allow different trees with the same basic parameters to be generated.
The underlying size of the tree in Blender units.
The maximum amount that the scale of the tree can vary (up or down) from the value of Scale.
The scale of the radius at the base of the tree.
The maximum amount that the radius scale of the tree can vary (up or down) from the value of Radius Scale.
The name of the preset to be exported. This will export all current properties of the tree to the Sapling preset folder as a py-file.
Export all current properties.
Any presets found in the Sapling preset directory may be imported when selected here.
This can be used to restrict what geometry is created when a preset is imported. If selected, only two levels of branches and no leaves will be generated.
Branch Radius
This sub menu contains the settings for the branch radius. You can adjust the bevel and taper of the branches here.
Branch Splitting
This sub menu contains the settings for branch splitting. You can adjust how the branches form and split here. Settings include levels, height and angle of the split.
Branch Growth
This sub menu contains the settings for branch growth. You can adjust how the branches grow here. Settings include length, angle and curvature.
Pruning
This sub menu contains the settings for pruning the branches.
- Press the Prune checkbox and you will see the prune object next to the tree.
- Change the settings to adjust the prune objects shape to form your tree.
Leaves
This sub menu contains the settings for leaves.
- Press the Show Leaves checkbox and you will see leaves on the tree.
- Press the Make mesh checkbox if you want to convert the curve to a mesh.
Settings include shape, object type, rotations and scale.
Armature
This sub menu contains the settings to add an armature to your tree. It’s not recommended to use this function on highly complex trees as it may take time to compute.
- Turn off leaves and prune if you have them on.
- Press the Use Armature checkbox to add the armature to the tree.
- Adjust the armature levels and bone length to your liking.
- Do not pose the bones until you have finished the tree.
- you are now ready to use the next sub menu Animation.
Animation
This sub menu contains the settings to animate your tree. It’s recommended to finalize all your settings now.
- You will need to have an armature already created above.
- Press the Armature Animation checkbox to add the animation to the tree.
- Press the Leaf Animation checkbox to add the animation to the leaves if you have them.
- Press the Fast Preview checkbox to hide the leaves and bevel for fast animation playback in the viewport.
Settings include speed, wind strength and leaf animation.
3D Viewport ‣ Add ‣ Curve ‣ Sapling Tree Gen
Andrew Hale (TrumanBlending), Aaron Butcher, CansecoGPC
This add-on is bundled with Blender.
© Copyright : This page is licensed under a CC-BY-SA 4.0 Int. License. Last updated on 08/14/2023.
Источник
