- 14 Map navigation tree
- Configuration
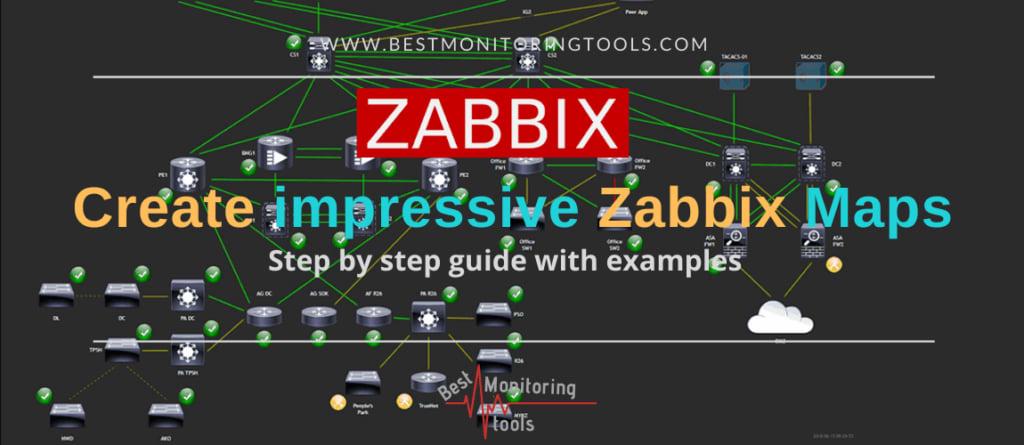
- Create Interactive Zabbix Maps | Learn with Examples (Tutorial)
- Step 1: Create Zabbix network map
- Step 2: Add host (map element) on Zabbix map
- Step 3: Add a link between two hosts on the Zabbix map
- Step 4: Add multiple links between two hosts on the map
- Step 5: Examples, Tips and Tricks
- a. Zabbix maps examples (screenshots)
- b. How to configure “Map navigation tree” widget on dashboard
- c. How to configure Zabbix “Geomap” widget on dashboard
- d. Custom background image in Zabbix map
14 Map navigation tree
This widget allows building a hierarchy of existing maps while also displaying problem statistics with each included map and map group.
It becomes even more powerful if you link the Map widget to the navigation tree. In this case, clicking on a map name in the navigation tree displays the map in full in the Map widget.
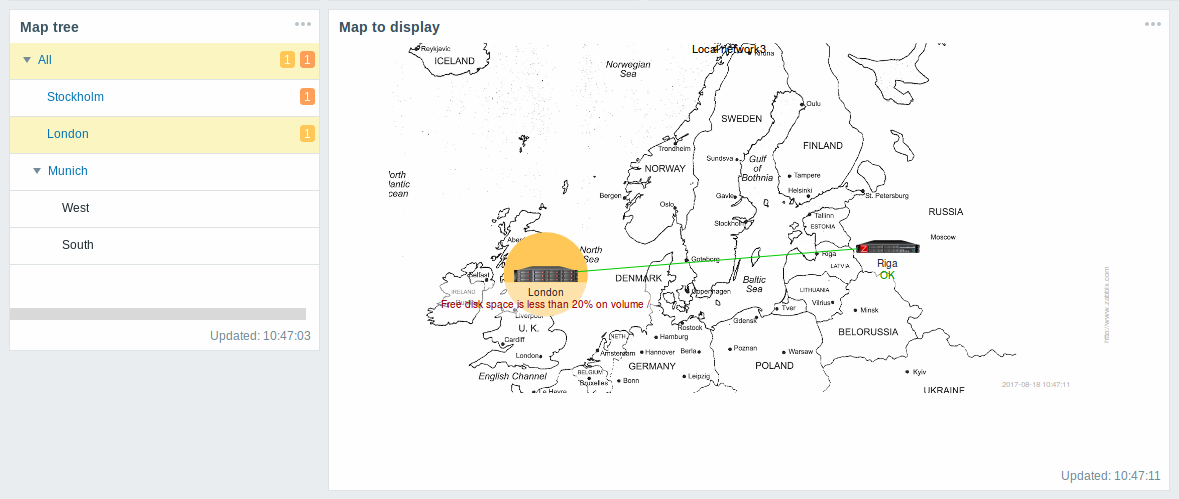
Statistics with the top-level map in the hierarchy display a sum of problems of all sub-maps and their own problems.
Configuration
To configure the navigation tree widget, select Map navigation tree as type:
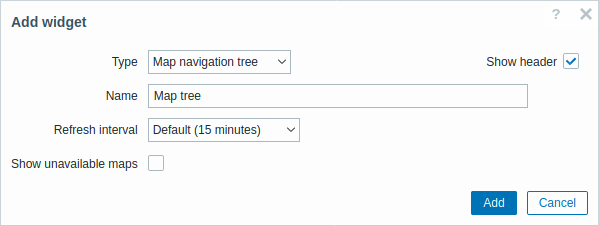
In addition to the parameters that are common for all widgets, you may set the following specific options:
| Show unavailable maps | Mark this checkbox to display maps that the user does not have read permission to. Unavailable maps in the navigation tree will be displayed with a grayed-out icon. Note that if this checkbox is marked, available sub-maps are displayed even if the parent level map is unavailable. If unmarked, available sub-maps to an unavailable parent map will not be displayed at all. Problem count is calculated based on available maps and available map elements. |
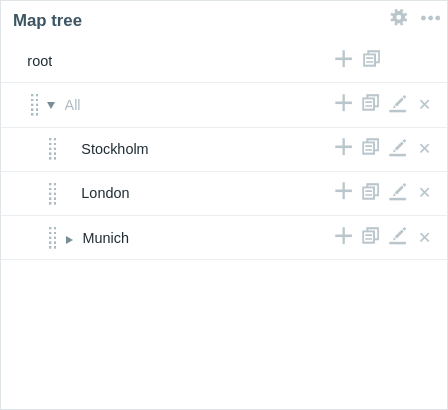
Navigation tree elements are displayed in a list. You can:
- drag an element (including its child elements) to a new place in the list;
- expand or collapse an element to display or hide its child elements;
- add a child element (with or without a linked map) to an element;
- add multiple child elements (with linked maps) to an element;
- edit an element;
- remove an element (including its child elements).
Element configuration
To configure a navigation tree element, either add a new element or edit an existing element.
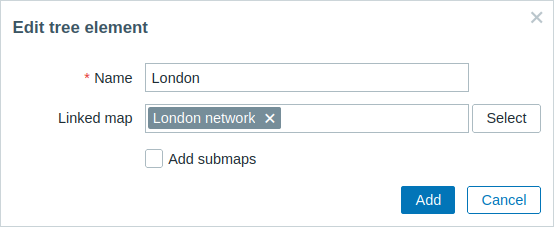
The following navigation tree element configuration parameters are available:
| Name | Enter the navigation tree element name. |
| Linked map | Select the map to link to the navigation tree element. This field is auto-complete so starting to type the name of a map will offer a dropdown of matching maps. |
| Add submaps | Mark this checkbox to add the submaps of the linked map as child elements to the navigation tree element. |
Источник
Create Interactive Zabbix Maps | Learn with Examples (Tutorial)
Zabbix maps are one of many tools we can use to visualize the collected data on Zabbix. Usually overlooked, because not many people know what can be done with Zabbix maps and how powerful they are. Some even use Weathermap plugin to view their network topology without knowing that the same can be done with the network maps in Zabbix. Weathermap plugin looks nice, but it’s too complicated to administer and it often breaks down after Zabbix upgrade.
Don’t complicate your administration with plugins like Weathermap – use Zabbix maps.
In this tutorial, we learn how to create interactive Zabbix network map that can show link traffic (bandwidth) and change the color of the link if there are some problems (red if link goes down or yellow if there is high utilization).
Don’t worry if you have never created a Zabbix map, because I will guide you step-by-step using various examples.
We will configure Zabbix topology map consisting of three hosts just as shown in the picture below.
Check out my post “Monitor Cisco Switch or Router with SNMP template” if you are just starting with Zabbix and you need to monitor your network routers and switches.
As a bonus, in this guide, I will show you how to use the Zabbix Geomap functionality that was introduced in Zabbix version 6.0 (jump to that section).
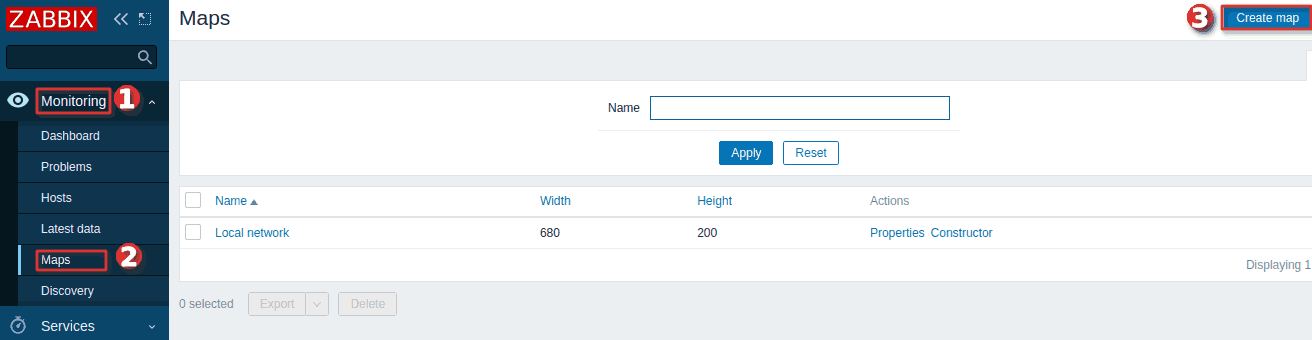
Step 1: Create Zabbix network map
To create a network map go to “Maps” under the “Monitoring” tab and click on “Create map” option just as shown in the picture below.
Name your map and choose dimensions – I will set 900 to the width and 700 for height. Select “Number of problems” under “Display problems” options.
Then, under “Advance labels” select “Label” from the dropdown menu “Host Label type” and select “Nothing” from the “Image label type” dropdown menu.
You can change other things, but for now that will not be necessary. Hit the “Add” button when you are done with configuring.

You can always return later and change map settings using “Properties” option under “Monitoring” → “Maps” just as shown in the picture below.
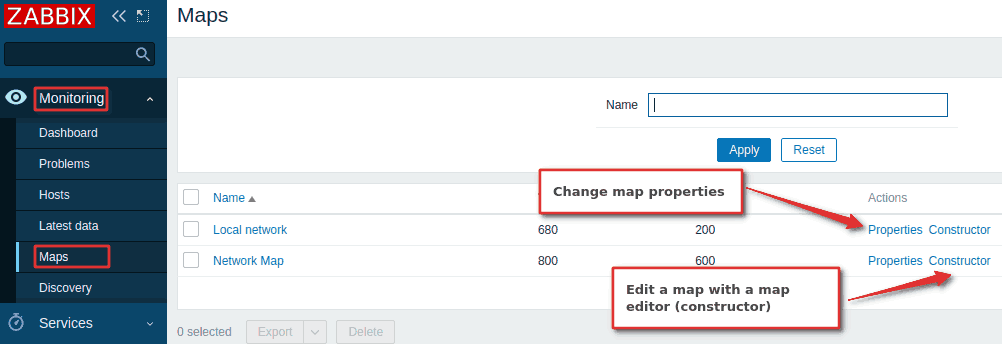
Let’s put some hosts and links on our newly created maps! Click on the “Constructor” option and move to the next step.
Step 2: Add host (map element) on Zabbix map
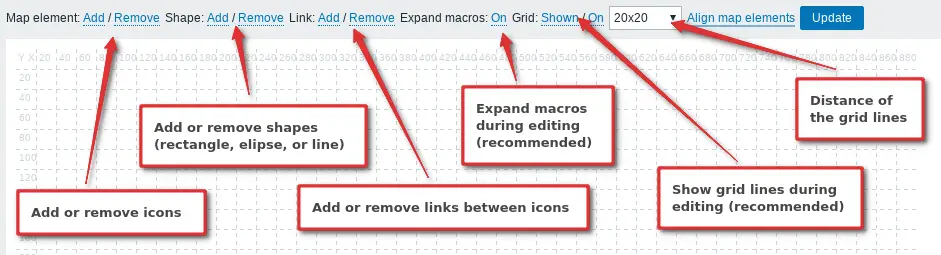
Just for convenience’s sake we will change some options on the map editor (constructor). Set “On” for “Expand macros” and “20×20” distance for grid lines. Also, make sure that grids are shown on the map.
Now add your hosts on the map using steps from the image below.
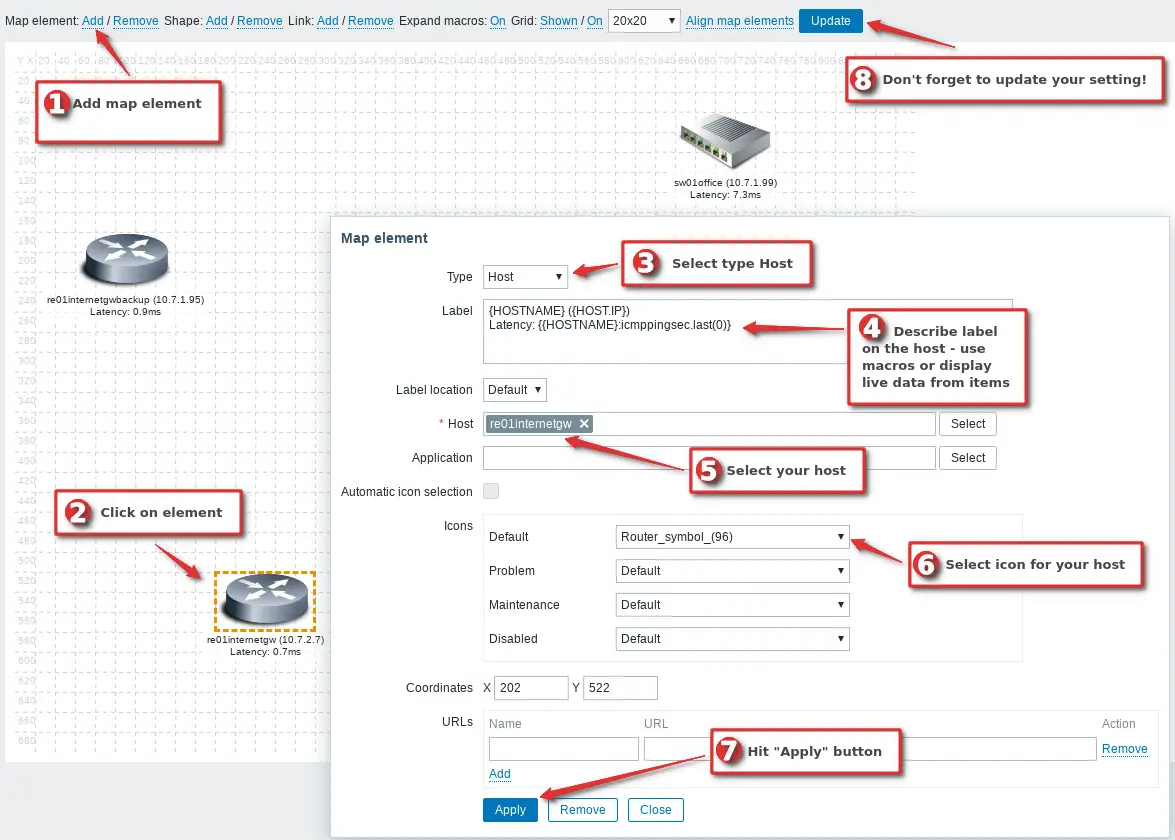
- Click on “Add” on “Map element“
- Select newly added element on the map
- Change “Type” to “Host“
- Describe “Label” on the host using free text input, or macros or live data from items (more about this later)
- Select you host
- Select icon for your host, I will use the icon “Router_symbol_(96)”, but you can select something else or even upload a custom icon.
- Click on “Apply” button
- Update map (don’t forget this!)
Step 4 is a bit confusing so I will explain it with more details.
In my example, I m using macro “ ” to display hostname that is set on Zabbix host and macro “ ” to display his IP address.
You can display live data from any item inside the host label on Zabbix map using the macro, but only with avg, last , min and max trigger functions.
In my example, I m displaying the latest value from the item called “ICMP response time” (key “ icmppingsec “):
New syntax expression (Zabbix 5.4 and later) ( ) Latency: /icmppingsec)> Old syntax expression (Zabbix 5.2 and older) ( ) Latency: :icmppingsec.last(0)>
Function “ last() ” tells Zabbix to display the latest data from the item, but you can also use avg , min and max functions like this:
New syntax expression (Zabbix 5.4 and later) Latency (now): /icmppingsec)> Latency (avg. in last 30 min): /icmppingsec,30m)> Latency (max. in last 24h): /icmppingsec,24h)> Old syntax expression (Zabbix 5.2 and older) Latency (now): :icmppingsec.last(0)> Latency (avg. in last 30 min): :icmppingsec.avg(30m)> Latency (max. in last 24h): :icmppingsec.max(24h)>
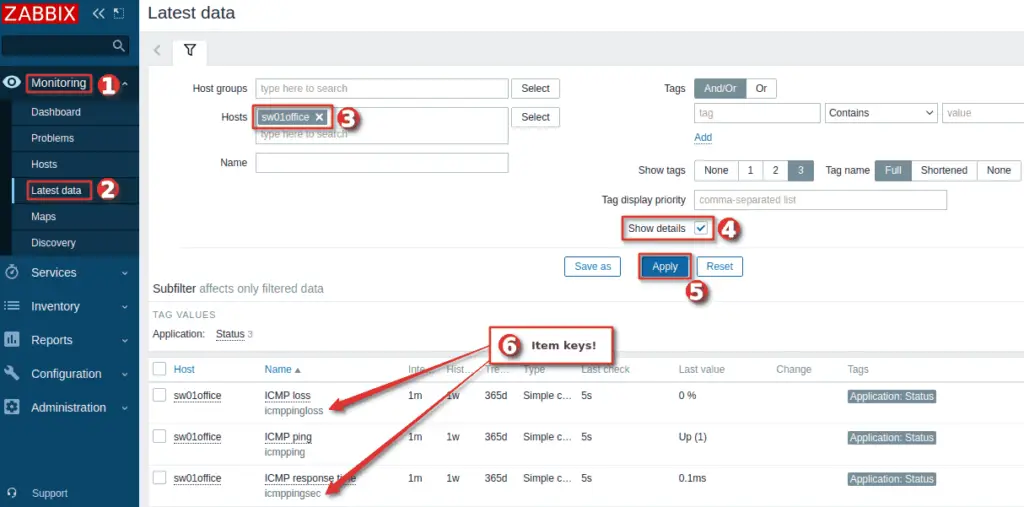
If you don’t know the item key name, you can find that out using “Latest data” tool with enabled “Show details” in filter just as shown in the picture below.
Step 3: Add a link between two hosts on the Zabbix map
Now that we have our hosts on the map let’s add some links between them.
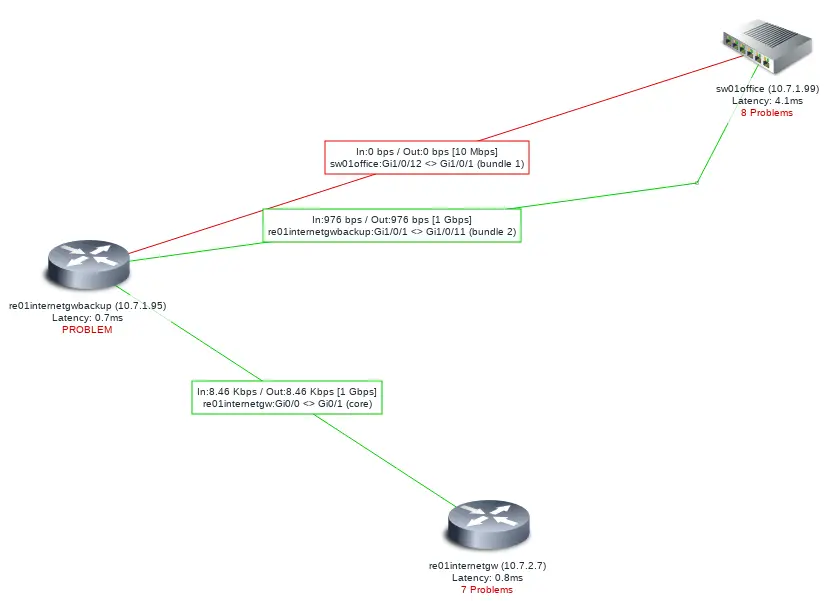
We will configure links to display current network interface inbound/outbound bandwidth and max. hardware speed.
Also, we will connect links with triggers so they will change color if there are some problems: green if everything is OK, red if the interface is down and yellow if bandwidth utilization is over 90%.
All the necessary steps to configure links are shown below.
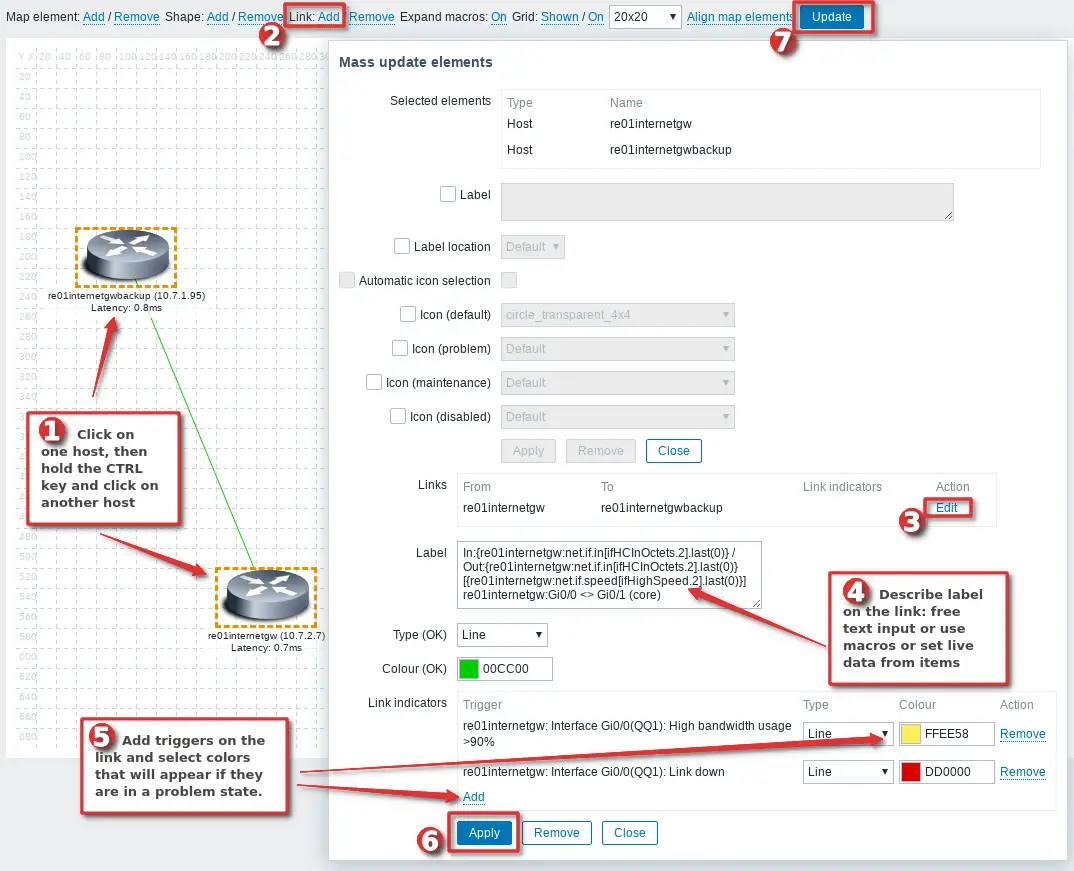
- Click on one host, then hold the CTRL key and click on another host
- Click on “Add” beside “Link” menu to add a link – a new window will appear
- Click on “Edit” under “Links” sections
- Describe “Label” on the link using free text input, or macros or live data from items (more about this later)
- Add triggers on the link and select colors that will appear if they are in a problem state
- Click on “Apply” button
- Update map (don’t forget this!)
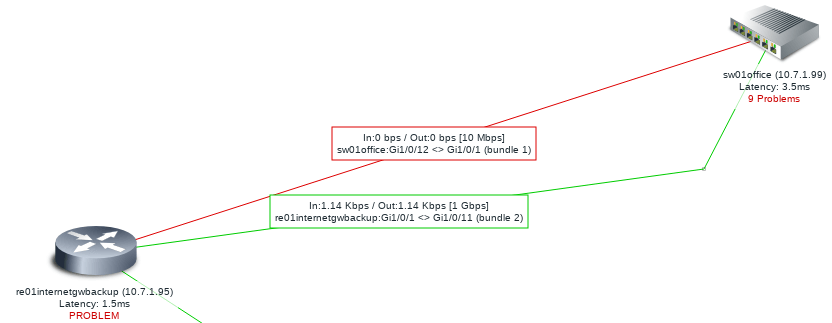
Remember how we displayed live data inside the host label using the “ ” macro? We can do the same with the link label, for example you can set this inside the label:
New syntax expression (Zabbix 5.4 and later) In: / Out: [] re01internetgw:Gi0/0 <> Gi0/1 (core) Old syntax expression (Zabbix 5.2 and older) In: / Out: [ ] re01internetgw:Gi0/0 <> Gi0/1 (core)
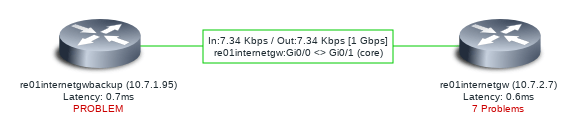
And it will resolve to this when viewed on the map:
Step 4: Add multiple links between two hosts on the map
Unfortunately, Zabbix maps are not perfect, they can’t display labels on two or more links without overlapping and links themselves are barely visible.
Luckily there is a workaround for that. You need to upload a transparent image that we will use to route links via a different path.
Download image circle_transparent_4x4 (right click + save links as) and import in Zabbix as custom icon just as shown in the picture below.
![]()
Next, add new map element with “Add” button, then click on that element, select type as “Image“, set icons to “circle_transparent_4x4” and hit “Apply” and “Update” map afterwards.
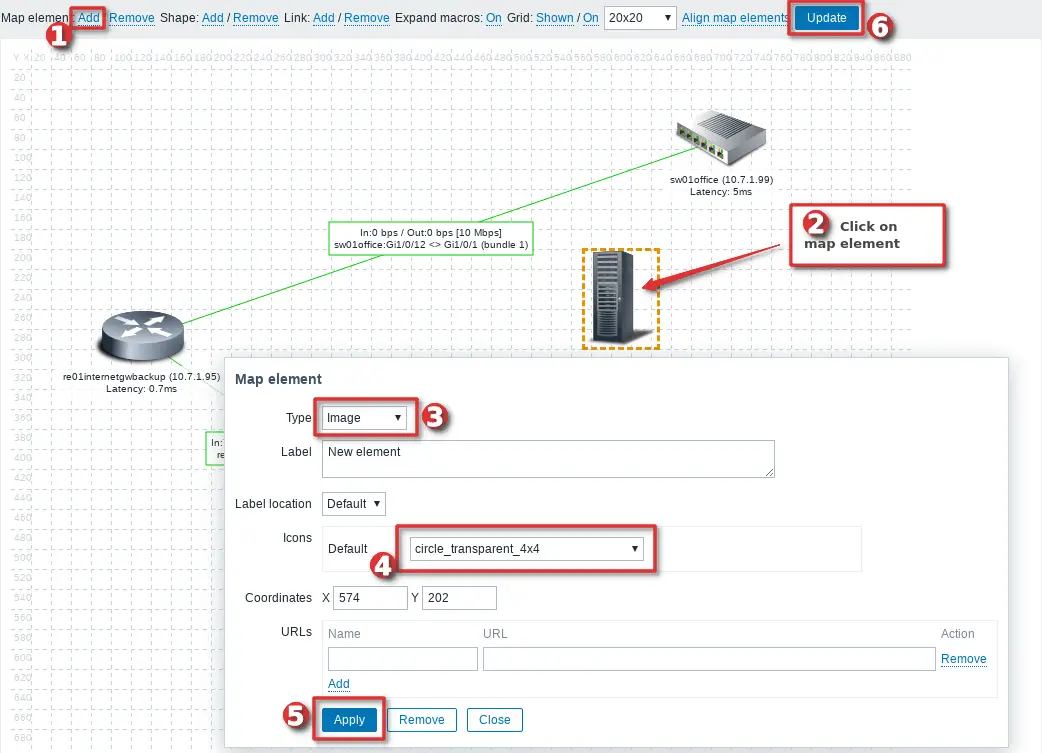
Well done! Now you have a barley visable circle on the map that you can use to route links via diffrent path. Using instructions from the picture bellow add one link from that circle to the host A and another link from the circle to the host B.
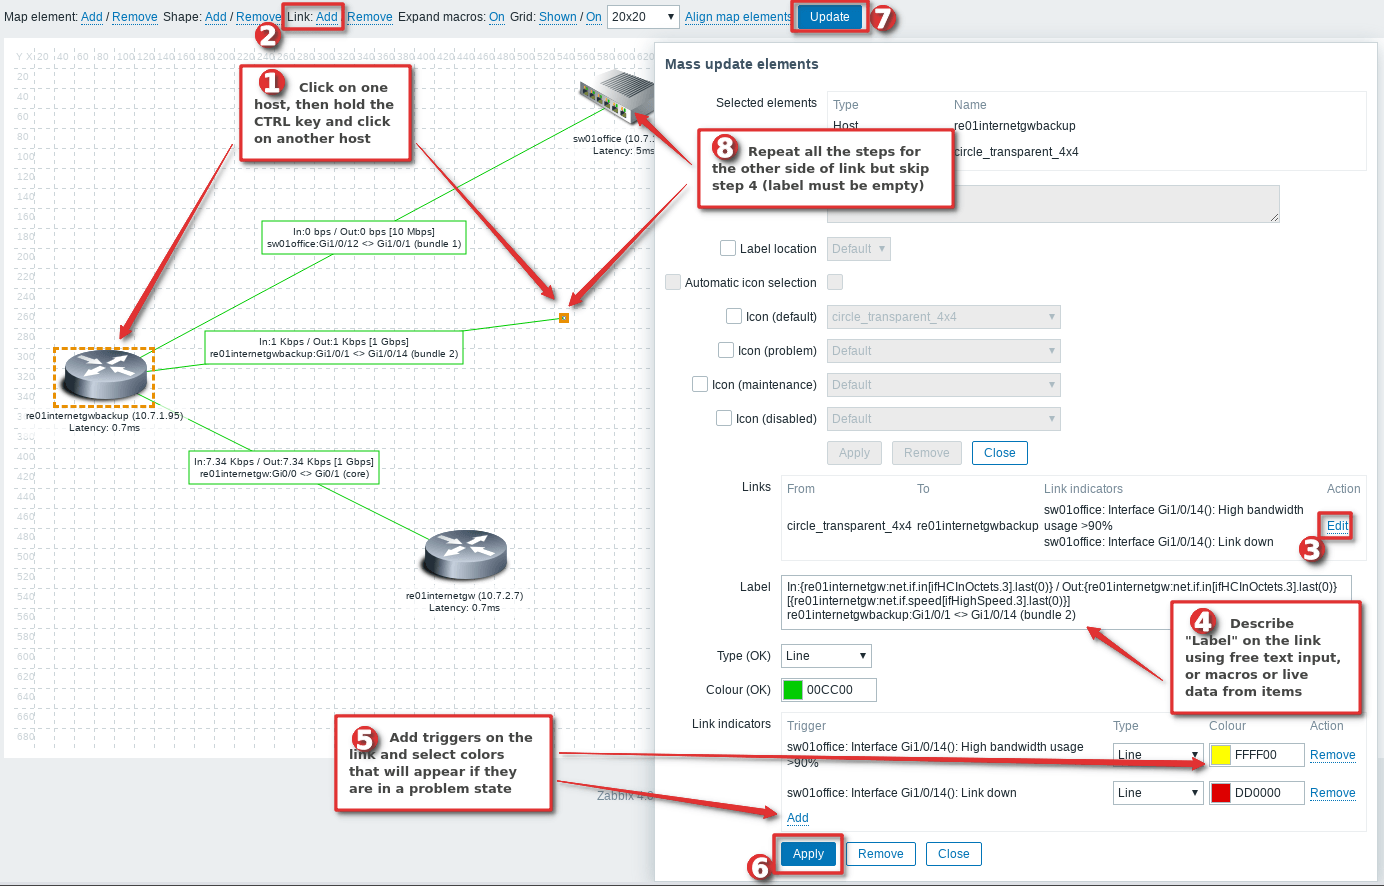
The final outcome should look like this:

You can also use more circles to draw multiple parallel links on a map like this one:
CONGRATULATIONS!
Now you know how to configure Zabbix maps!
CONTINUE TO LEARN MORE
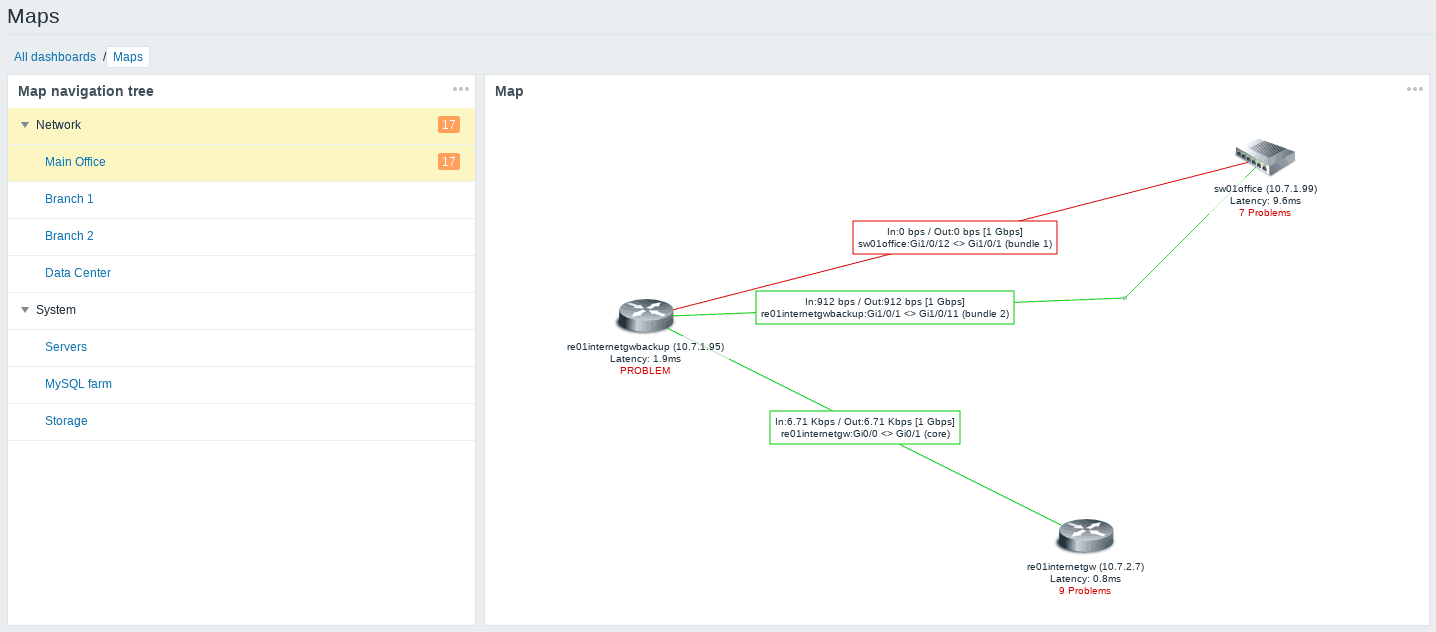
Examples of Zabbix maps (screenshots)
How to configure Zabbix “Geomap” widget on dashboard
How to configure map navigation tree on dashboard
Setting custom background image on map
Step 5: Examples, Tips and Tricks
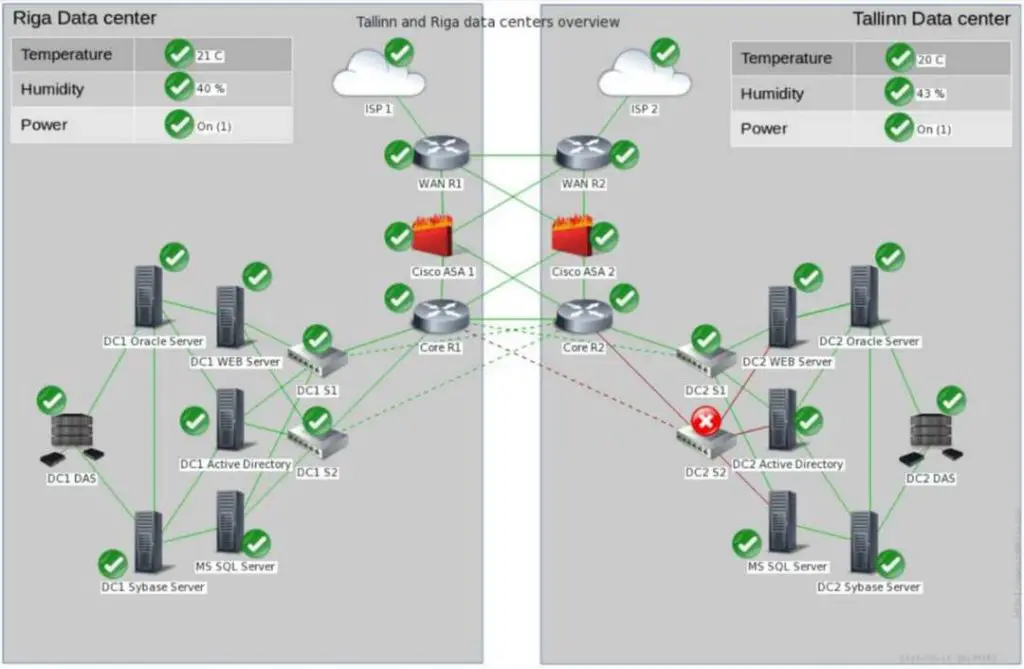
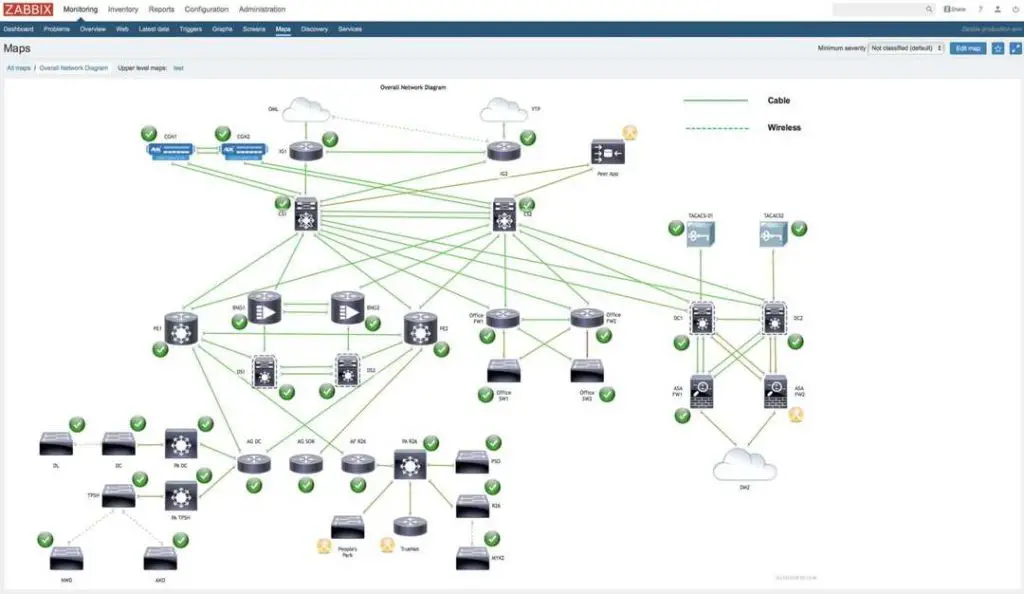
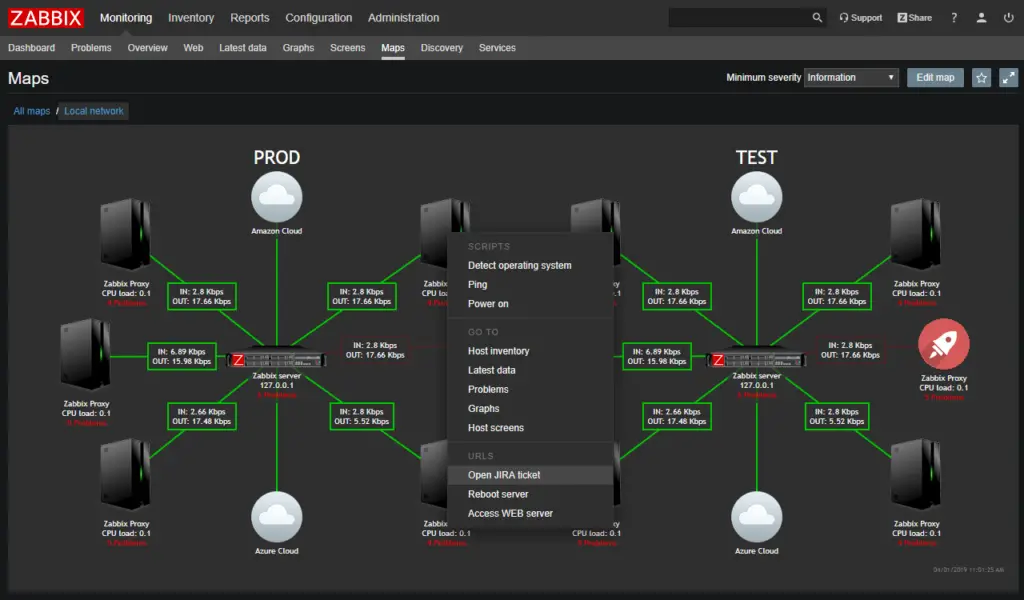
a. Zabbix maps examples (screenshots)
Run out of ideas for Zabbix maps? Need more examples? Check out these screenshots:
b. How to configure “Map navigation tree” widget on dashboard
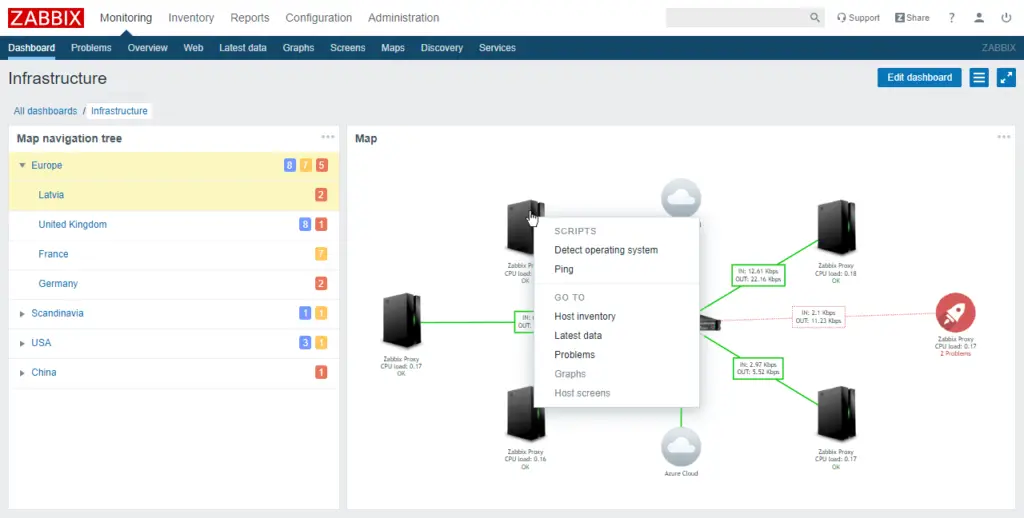
Zabbix has a “Map navigation tree” widget that you can use on the dashboard. “Map navigation tree” widget enables you to sort and view maps hierarchically just as shown in the example below.
First, create a dashboard just for maps or use the existing dashboard if you want to combine a “Map navigation tree” widget with others.
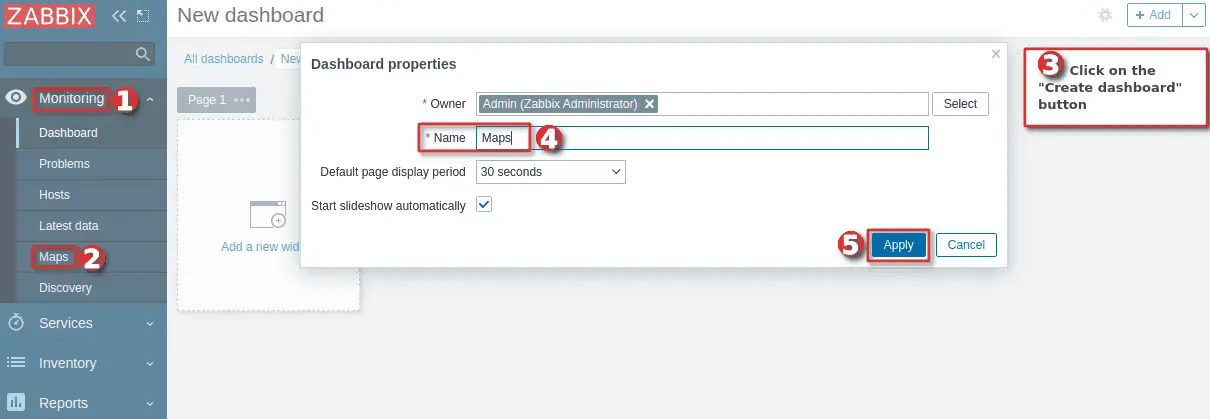
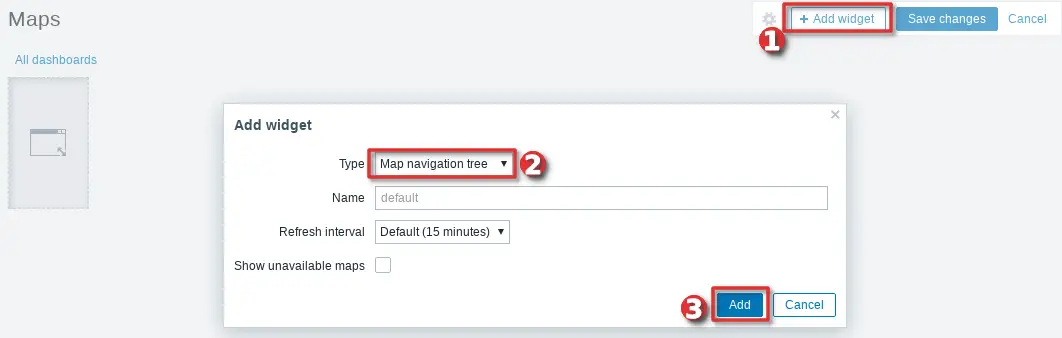
On your new dashboard add “Map navigation tree” widget.
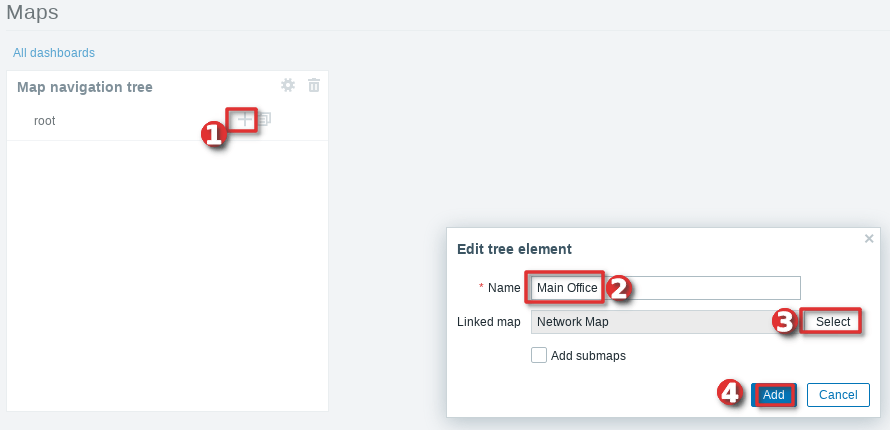
Then add tree element (map) on the “Map navigation tree” widget.

Great job! Now we must define “Map” widget on the same dashboard that will render maps from “Map navigation tree” widget.

Add other maps in a hierarchical way or as you wish.
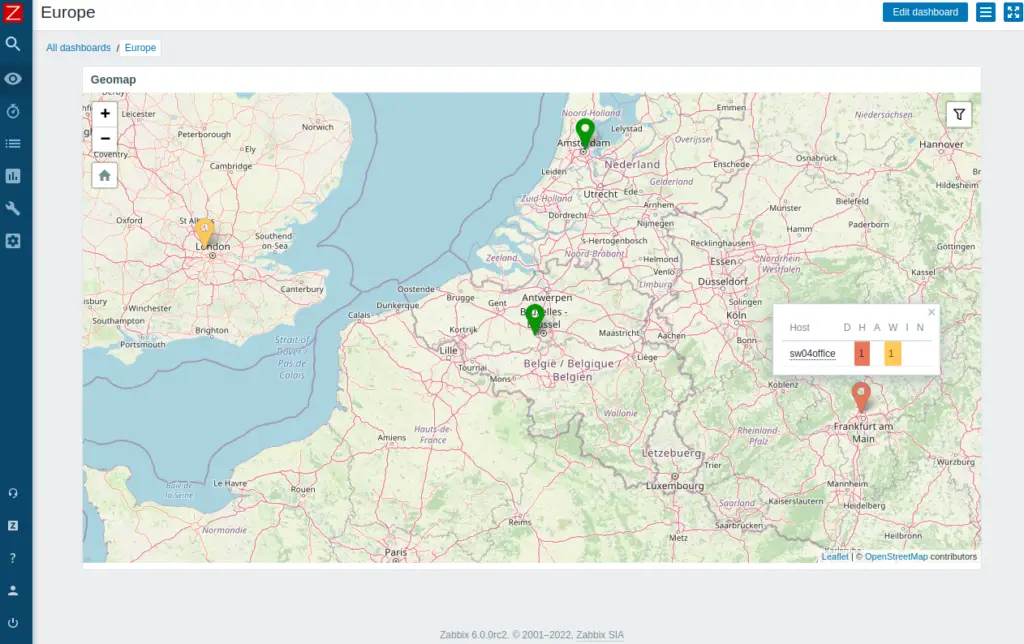
c. How to configure Zabbix “Geomap” widget on dashboard
Great news! Zabbix can display hosts on a geographical map since the 6.0 version. Unfortunately, it is only possible to display hosts and their active alarms (triggers). You can’t display links between hosts, for that you still need to use a background image – more about that in the next step.
Nevertheless, this widget is extremely useful so let’s see how to configure it.
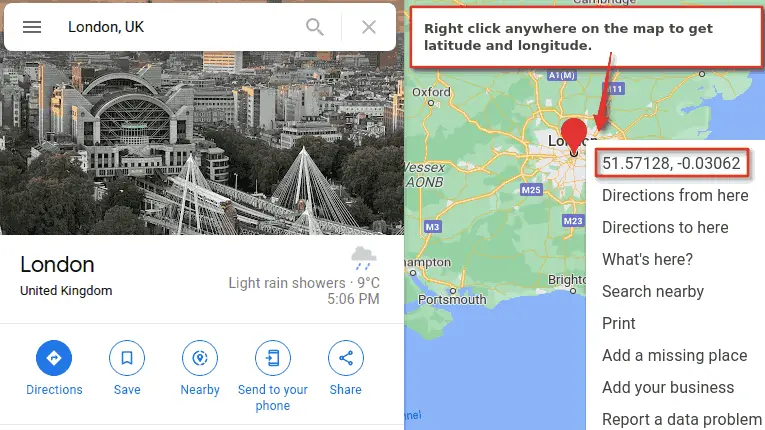
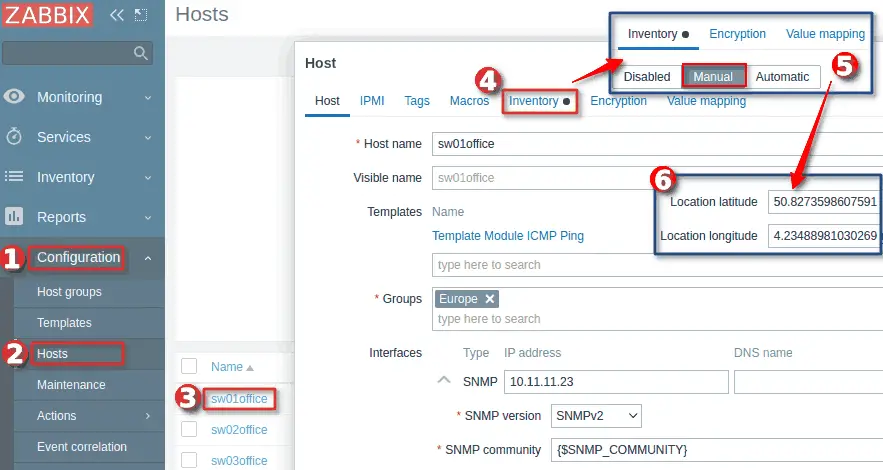
By default, the geomap displays all hosts with valid geographical coordinates defined under the host inventory. Therefore, first we need to configure the hosts before we can configure the geomap.
For example, I have network switches in London, Amsterdam, Brussels and Frankfurt, so I will copy / paste geographical coordinates from Google Maps on the hosts in Zabbix.
Need more details? Here are step-by-step instructions. Navigate to Configuration → Hosts → Select your Host. Switch to tab Inventory → Change inventory mod to “Manual” → Enter coordinates into “Location latitude” and “Location longitude” fields.
Great job! Now go to the dashboard section and create a new dashboard or use an existing one.
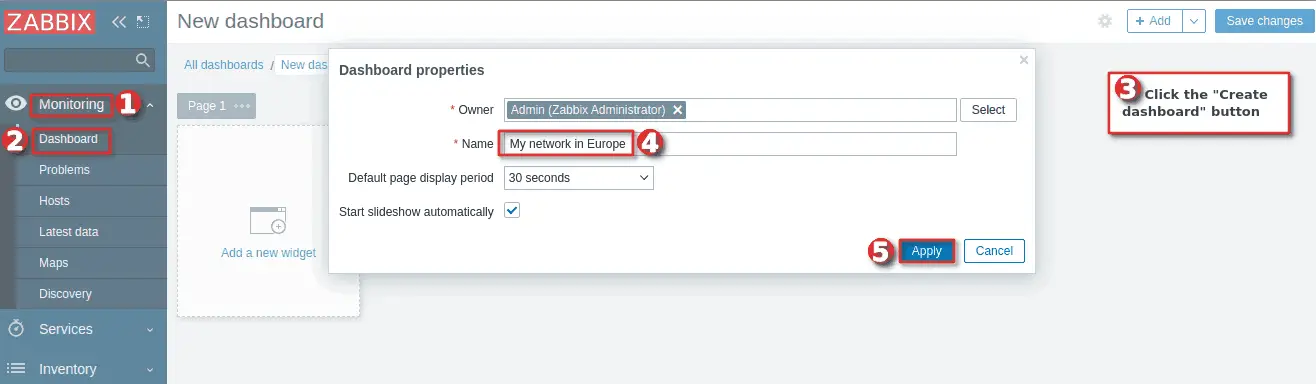
Then create a Geomap widget on the newly created dashboard. Click on that little “Add” button, then select the host groups that contain all the hosts you want to display on the map.
Optionally, in the field “Initial view” you can use the center coordinates and set the default zoom level to be used when the widget is initially loaded. Use format ” ,, “, for example 50.896097198252015, 4.195197934217,6. In my example, I will use the latitude and longitude of my center city and zoom level of 6
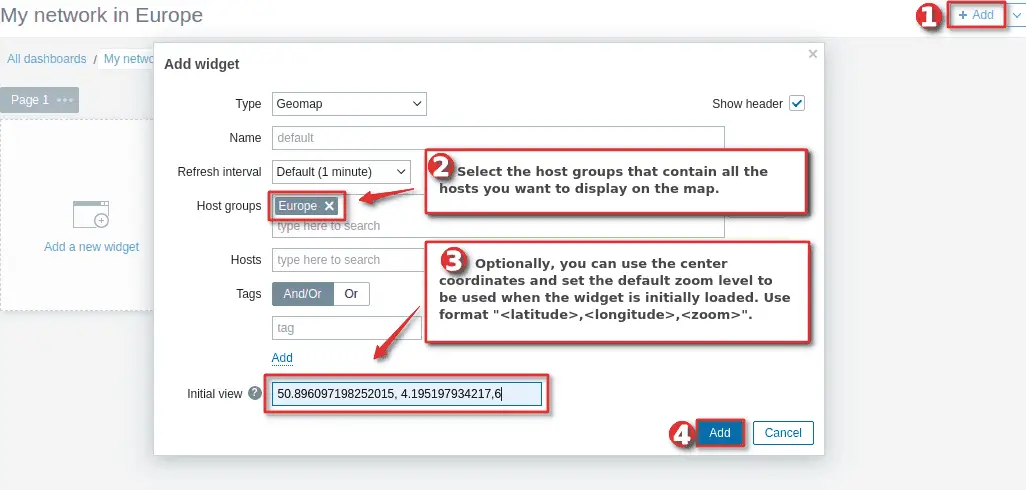
If you did everything correctly, after saving your dashboard you should have a geomap similar to the one in the image below.
Nice job! You have now learned how to manually define geographic coordinates on hosts and display them on the dashboard.
However, what if you need to set geo coordinates on hundreds or thousands of hosts? Well, you have multiple options for that.
One option involves writing a script that will populate the inventory latitude and longitude fields via the Zabbix API. In this case, you must have coordinates in some database such as CMDB.
Another option would be to use inventory in automatic mode and configure items to gather latitude and longitude information from devices using SNMP protocol or something similar.
d. Custom background image in Zabbix map
You can set custom background image in Zabbix maps.
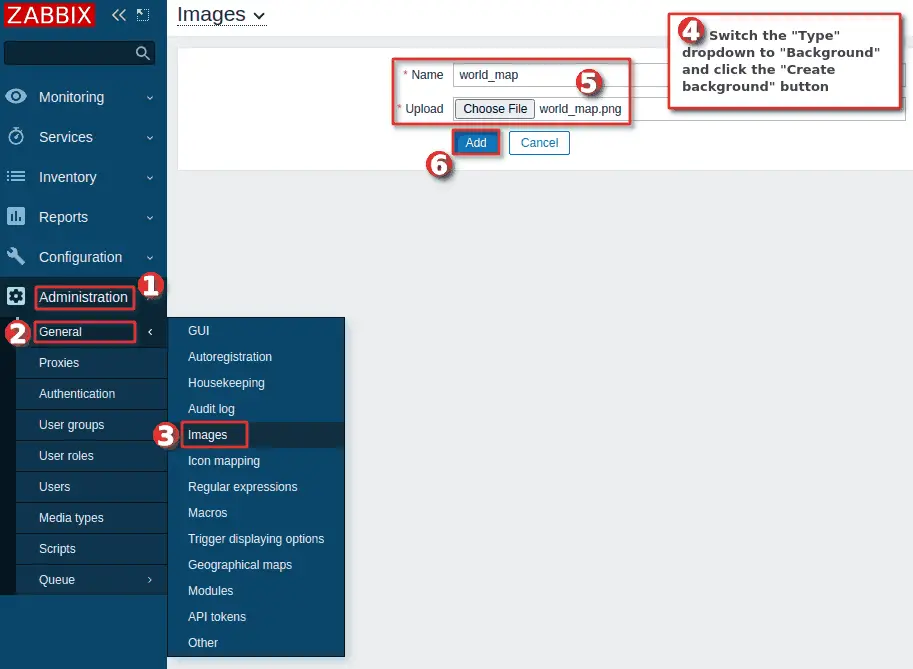
First, you need to upload the image to Zabbix image repository just as shown in the picture below.
Second, you need to open “Properties” of the map and set your newly added image file as a “Background image”.
Источник